How to fix WordPress not sending emails: 5 easy methods
Sending emails to subscribers from your WordPress site is a great way to increase engagement, whether it’s an auto-reply for contact form submissions or a scheduled weekly newsletter.
Unfortunately, sometimes WordPress emails might fail to send or end up in the recipient’s spam folder. If you experience issues with WordPress not sending emails, read on to find out the possible causes and easy ways to fix them.
Download all in one WordPress cheat sheet
Why is WordPress not sending emails?
Before we proceed, let’s perform a test to see whether your WordPress site is sending emails correctly.
Simply install the Check & Log Email plugin from your WordPress dashboard. Once activated, head to the plugin’s Status section and send test emails to different addresses.

If none of your emails reach their intended recipients, chances are something is wrong with your WordPress website.
This error can happen for various reasons, but here are the most common culprits:
Server misconfiguration
WordPress has a function called wp_mail to send emails using PHP. This function relies on your site’s web server to route and deliver messages.
The problem emerges in that some web hosting companies may not support the PHP mail function or require additional configuration for it to function correctly.
Temporary block
In other cases, your web host might turn off the PHP mail function for a couple of reasons:
- Spam prevention. Some web hosts impose limits on the number of emails sent per hour to prevent spam campaigns. If you exceed them, you can’t send emails anymore.
- Security concerns. Your hosting platform might block email functionality when it detects suspicious activity or potential security vulnerabilities on your website.
Poor sender reputation
When using a shared IP address, other senders using the same server can affect your WordPress email deliverability.
If they receive a lot of reports for spam, it will affect your reputation as well. As a result, your WordPress emails will end up in the recipient’s spam folder.
Incorrect plugin settings
If you’re using a contact form plugin to manage form submissions, the issue might lie with the plugin’s configuration. Check the plugin’s settings to ensure it’s using the correct email settings and functioning as intended.
Server issues
Occasionally, temporary glitches or server overload on your web host’s end can cause emails to fail. In that case, contact its customer support for assistance.
5 ways to fix WordPress email issues
Whatever the cause is, poor email deliverability can negatively affect your email marketing campaigns. Luckily, troubleshooting issues with WordPress not sending emails is usually quick and easy.
Check the email settings in the WordPress dashboard
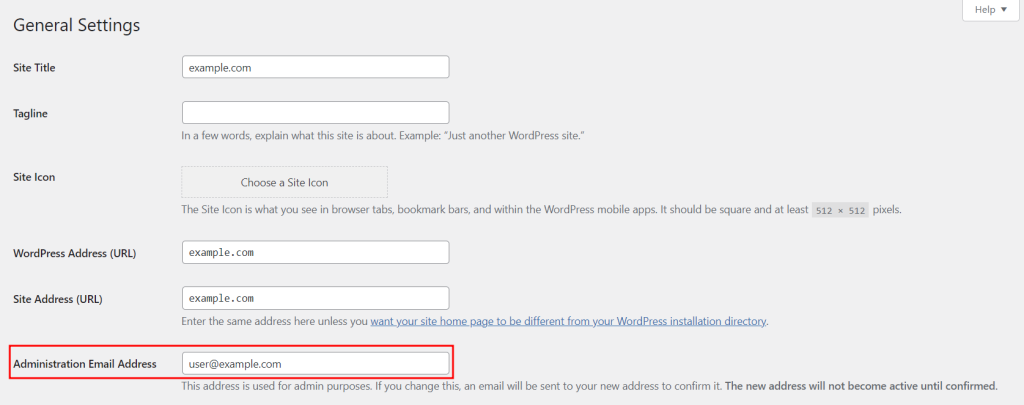
It may sound like a minor problem at first, but a missing or wrong email address in your WordPress admin dashboard will prevent any emails from being sent.
To fix this, open the WordPress dashboard and go to Settings → General. Double-check whether you’ve entered the correct address in the box next to Administration Email Address.
2. Reset the email settings in your hosting account
If the problem persists even after using the correct admin email address, the problem might be related to your hosting.
Sometimes, your web host creates a temporary block after you send too many emails within an hour. To remove this ban, try to reset the email settings from your hosting control panel.
If you’re a Hostinger user, you can turn off your email account temporarily and then re-activate it via hPanel:
- Navigate to Emails at the top menu and select Manage next to your email address.
- Click the three-dot icon on the right side of your email domain, then open Settings.
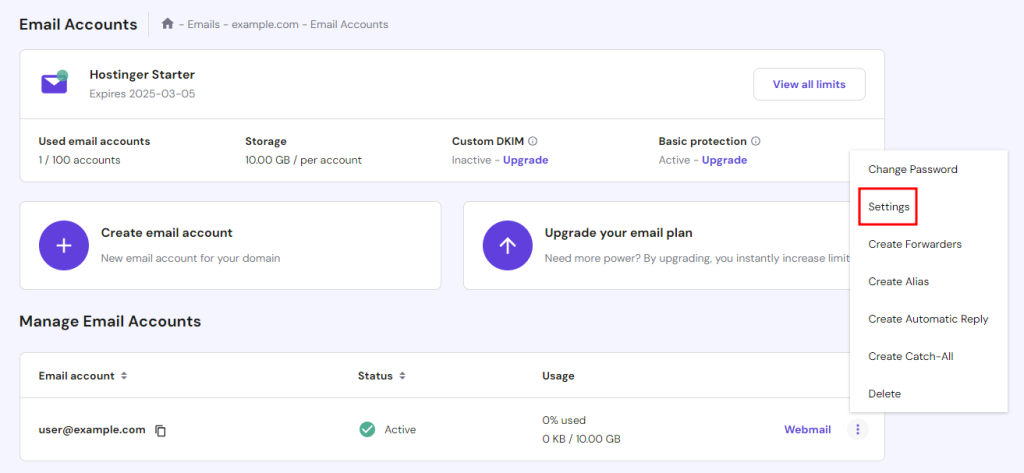
- Deactivate your email account and click Update.
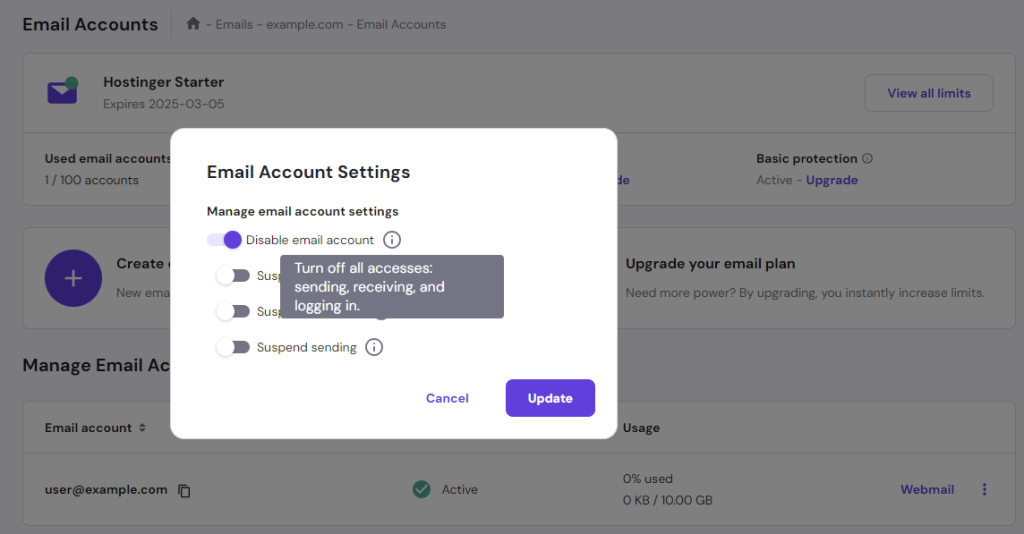
- To reset the email service, re-activate your account by accessing Settings again and turning Disable email account off.
- Don’t forget to update your changes.
If you encounter any difficulties during the process, feel free to contact our Customer Success agents via live chat.
3. Set up SMTP in WordPress using a plugin
Short for Simple Mail Transfer Protocol, SMTP offers an alternative for sending emails from your WordPress website.
With SMTP, you’re using a dedicated email server separated from your hosting server. In other words, this approach allows you to neglect any restrictions imposed on the PHP mail function.
We recommend using WP Mail SMTP, a beginner-friendly plugin that helps your emails bypass spam tests and firewalls for improved email deliverability.
The WP Mail SMTP plugin works alongside various email servers, but each server requires different information for configuration and authentication. For example, Google users need their Gmail account client ID to use this plugin.
In this tutorial, we’ll focus on setting up a mail server using Hostinger’s email service. But before installing and configuring the WP Mail SMTP plugin, you’ll need to know your email server details first.
Accessing email server details
If you’re on Hostinger, here’s how to get the details needed for the WP Mail SMTP configuration:
- Go to Emails → Manage from your hPanel account.
- Under Manage Email Accounts, copy and save your email address. We’ll use it as your SMTP Username later on.
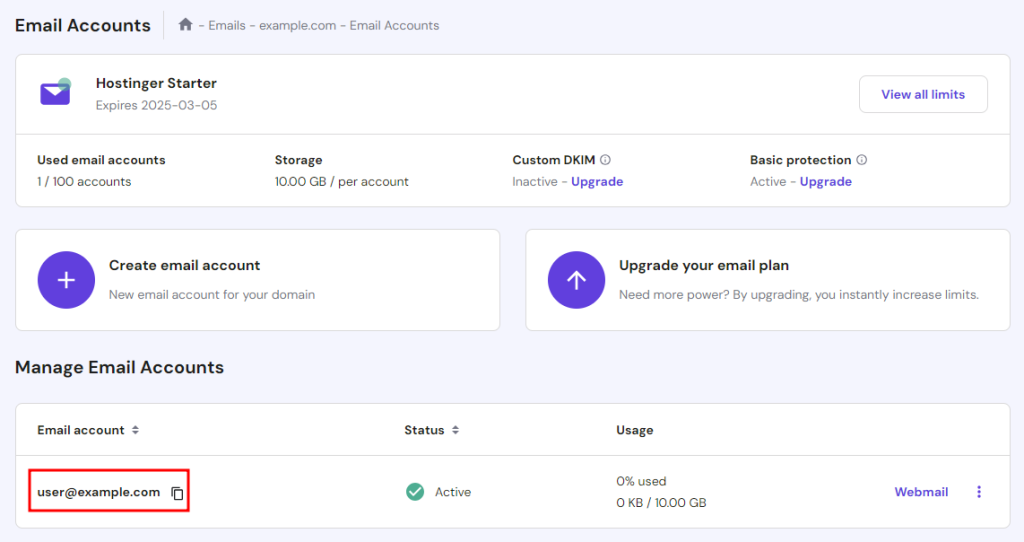
- You also need your email password for the SMTP Password. If you can’t remember it, click the three-dot icon and select Change Password.
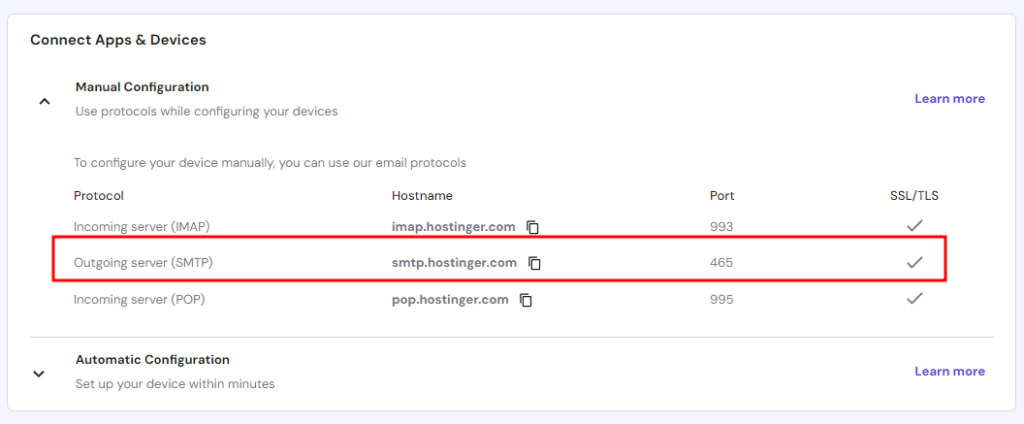
- To view the rest of the configuration details, go to Connect Apps & Devices on the left sidebar.
- From there, take a screenshot of the outgoing server’s Hostname and Port to fill in the SMTP Host and Port fields in the WP Mail SMTP plugin settings.
Setting up WP Mail SMTP
Once you’ve saved all the necessary server details, it’s time to set up the WP Mail SMTP plugin via the WordPress dashboard.
Go to Plugins – Add New Plugin and search WP Mail SMTP in the relevant field. Once found, install the WordPress plugin and click the Activate button.
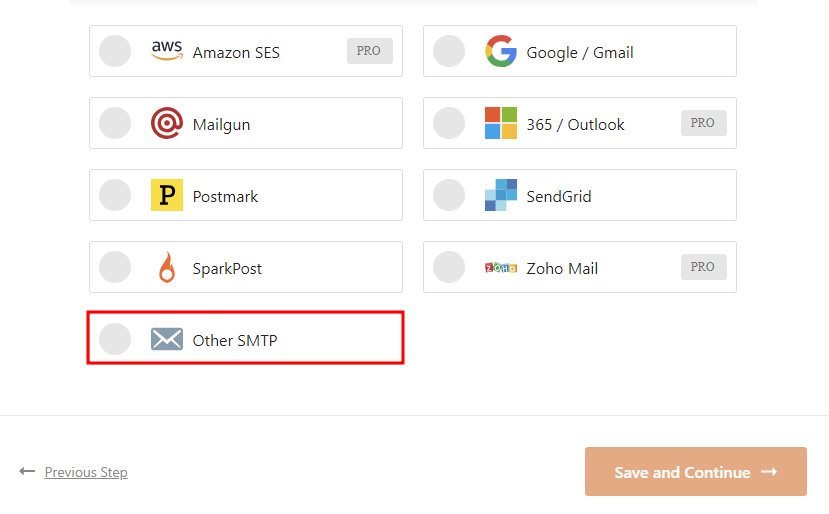
When the setup wizard appears, click Let’s Get Started. On the next page, choose Other SMTP as your SMTP mailer.
Under Configure Mailer Settings, fill in the information based on your server details:
- SMPT Host – copy and paste your outgoing server hostname, like smtp.hostinger.com.
- Encryption – our server supports both Secure Sockets Layer (SSL) and Transport Layer Security (TLS). However, we recommend choosing TLS, as it’s the newer version of SSL.
- SMTP Port – insert 465 for SSL and 587 for TLS.
- Authentication – keep it enabled to authenticate your email.
- SMTP Username – enter your admin email address.
- SMTP Password – fill in the password of your email server.
- From Name – use a name that represents your website, such as its title. Enabling Force From Name prevents other plugins from changing the name.
- From Email – add an existing admin email address that represents your website. When you turn on Force From Email, other plugins like contact forms cannot change this email setup.
Save your changes and go to the next setup page. Here, you can choose which features you want to activate. By default, Improved Email Deliverability and Email Error Tracking are enabled.
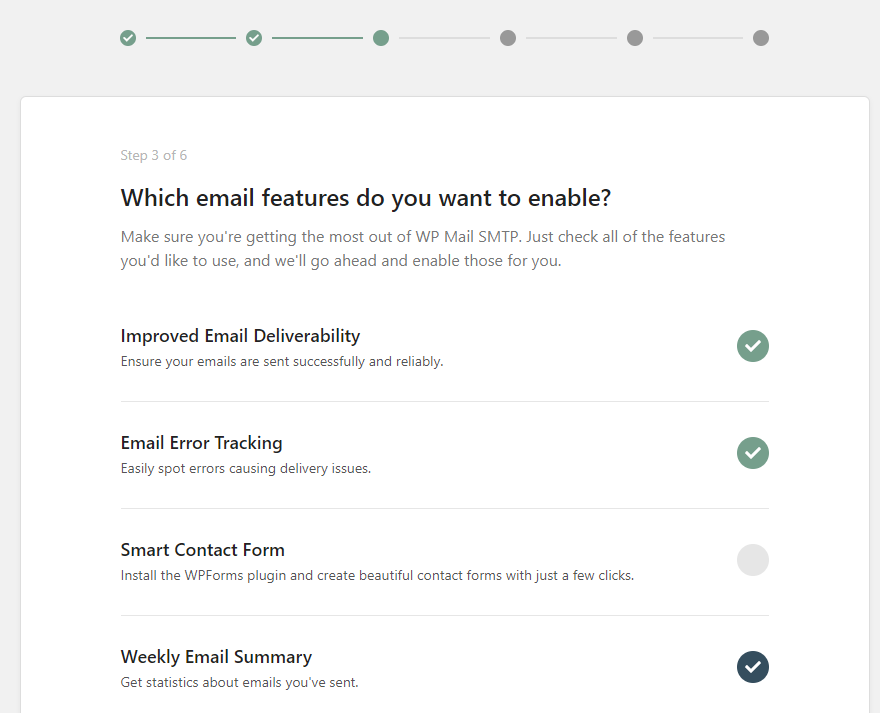
Complete all the remaining steps to finish the setup. WP Mail SMTP will send you a test email to make sure everything works properly.
4. Configure contact form plugins
This step applies if you need help with automated email responses for form submission, not emails sent from WordPress itself like admin notifications.
Many contact form plugins rely on their own settings to manage email responses. When someone submits a form, the plugin triggers an email notification to their address.
If the email fails to send, the issue likely lies within the plugin’s configuration, particularly the sender and recipient email addresses.
Here’s how to check and configure these settings using the popular Contact Form 7 plugin as an example:
- In your WordPress dashboard, navigate to Contact → Contact Forms.
- Hover over your intended contact form and click Edit.

- Open the Mail tab, and you’ll find the From and To fields.
- Make sure the From email address uses the same domain name as your site. The To address must also use the correct mailbox syntax.
If you enter the fields incorrectly, a few warning messages will appear, like in the example below.
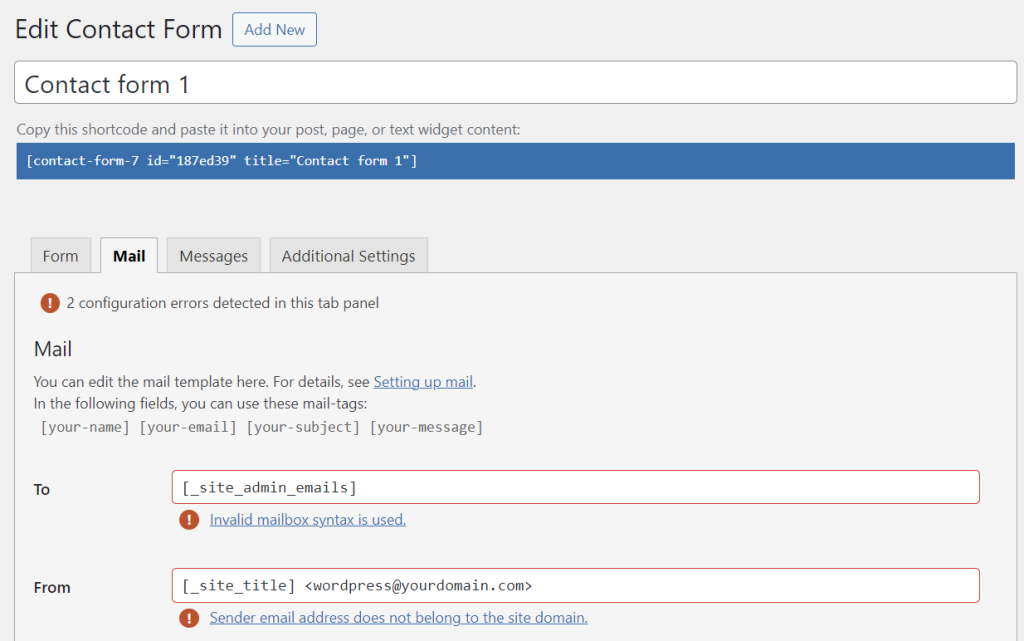
Just click on the provided links to discover what went wrong and how to fix the errors.
5. Prevent the emails from going to spam
Even if your WordPress emails are sent successfully, they might still end up in the recipient’s spam or junk folder.
It usually happens because WordPress isn’t properly authenticated with a reputable email provider or when the email content triggers a spam filter.
Here’s what you can do to prevent your emails from going to spam:
- Use a professional address. Most recipients don’t trust emails coming from a free address like user@gmail.com, as anyone can quickly get one. Instead, employ a professional email address using your domain name to build trust.
- Write high-quality subject lines. Avoid misleading subject lines, bold claims, or any other clickbait tactics that may trigger spam filters.
- Utilize a dedicated IP. Email providers often block shared IP addresses due to high spam activity. That’s why using a dedicated IP address will improve your email deliverability. Plus, your site is less affected by security issues on other sites that share your IP address.
- Enable DKIM. DomainKeys Identified Mail (DKIM) is an authentication protocol that helps verify the legitimacy of your emails. This ensures that your messages don’t go to the spam or junk folder.
If you’re using a shared IP address, we recommend switching to a hosting service that offers a dedicated IP address, like Hostinger’s WordPress Cloud Startup plan.
You can create up to 100 domain-based email addresses at no extra cost, which will make your emails appear more professional. It’s also easy to add a DKIM record to improve your email reputation via our user-friendly hPanel.

Conclusion
Sending emails from your WordPress website is a great way to reach new audiences and engage with subscribers. Unfortunately, there are cases when WordPress stops sending emails due to various reasons.
To solve this problem, check whether your email settings are correctly configured in both the WordPress dashboard and your hosting account.
If everything looks good and you still have trouble sending emails, then we recommend setting up an SMTP email service in WordPress using the WP Mail SMTP plugin.
We hope this article has helped you fix the WordPress email issues. If the problem persists, let us know in the comments section below.
WordPress not sending emails FAQ
Find answers to commonly asked questions about WordPress not sending email errors.
How to test if WordPress is sending emails?
If you’re not sure whether WordPress is sending emails properly, run a test using a plugin like Check & Log Email. Simply install the plugin and send a test email to verify whether the PHP mail function works.
How do I allow WordPress to send emails?
By default, WordPress allows you to send emails as long as your admin email address is correct. To check, go to Settings → General from the WordPress dashboard, locate Administration Email Address, and make sure there’s no typo in your address.


Comments
November 09 2020
that was helpful