How to edit and customize WordPress user roles and permissions
When building a WordPress website with multiple team members, assigning user roles ensures your site’s security. Think of it like in a physical workplace – not everyone should be granted access to all areas.
Similarly, assigning roles on your WordPress admin dashboard gives each user the right level of access to do their job.
Let’s explore the different WordPress user roles and learn how to assign them to other team members. We will also guide you through editing permissions of each user role with a plugin.
Understanding WordPress user roles and permissions
A role defines a user’s access level. Meanwhile, permission defines the specific actions users can do on the website, like publishing a post, installing a plugin, or moderating comments.
In other words, roles contain a set of permissions. Therefore, assigning the correct role to each user is essential for ensuring:
- Security – limiting user permissions reduces the risk of unauthorized changes or security breaches.
- Proper task management – users should only see and perform tasks relevant to their responsibilities.
- Efficiency – roles help streamline workflow by letting users focus on their scope of work only.
What are the default WordPress user roles?
Essentially, there are five WordPress default user roles. Activating a WordPress multisite will unlock an additional super admin role.
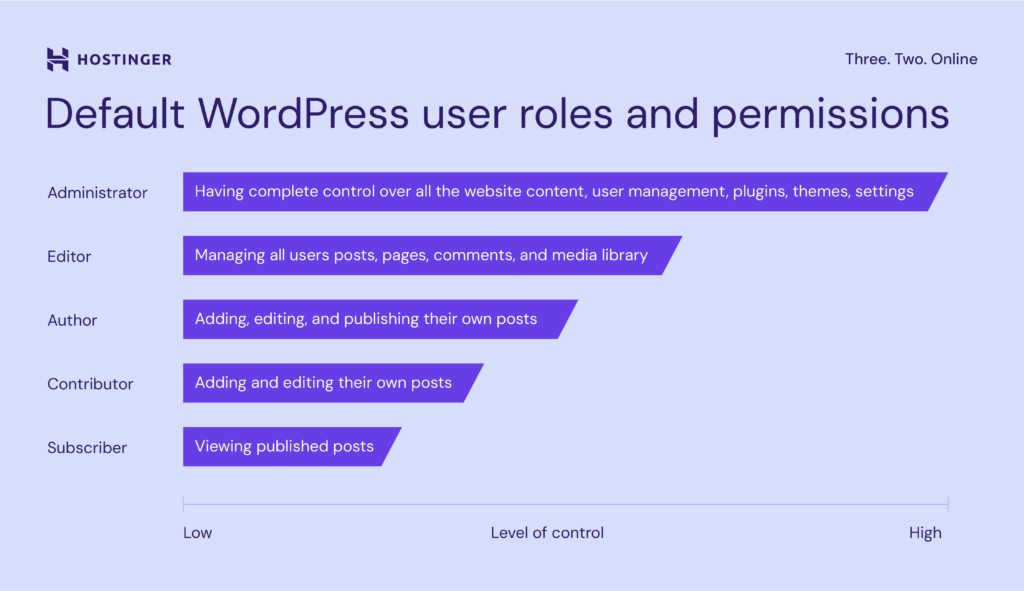
Here’s how each differs from the other:
1. Subscriber
Subscriber has the lowest control in WordPress. Granting users this role allows them to view published posts and manage their profile section on the dashboard.
This user role will be most beneficial if you want to create a membership WordPress website.
2. Contributor
Users with the contributor role can only add and edit their own content. They don’t have permission to publish. Once they’ve written the post, the site administrator or editor will review the content before making it live.
Therefore, this role is perfect for someone who wants to join a one-off collaboration with your site.
3. Author
As the name suggests, authors produce the site’s content. They unlock permissions that contributors don’t have, such as uploading media, creating, editing, publishing, and deleting posts.
That said, their access is limited to their own content management, meaning they can’t organize other users’ posts.
With this in mind, assigning the author role is perfect for regular contributors on your site.
4. Editor
Above the authors, editors hold high-level access to manage the website content. They can approve comments, organize the media library, and edit pages.
The editor’s permission is limited to content management and overseeing the work of other users and contributors. Editors can’t access the installed themes and plugins, approve updates, or tweak site settings.
Assigning this role to your site’s content manager, team leaders, and senior contributors is the ideal scenario.
5. Administrator
The administrator role holds the highest position in the hierarchy. This means administrators have complete control over every aspect of the website, including managing users and changing critical website configurations.
When you create a new WordPress website, this role will be assigned to you by default.
6. Super Admin
There will be an additional super admin role specifically for WordPress multisite networks. It functions equally as the administrator, but the scope is elevated to multiple websites, hence the term super.
Super admins have permission to perform administrative tasks within the network, such as adding or deleting websites, installing a WordPress theme or plugin, and organizing content. They also have complete control over all the network’s users.
Plugin-related user roles
You can add a wide range of functions to your website using WordPress plugins. Depending on the plugin’s features, you may find some extra user roles when it’s activated. Here are a few plugin examples, along with the roles they include:
WooCommerce (for adding eCommerce functionality)
- Customer – will be assigned to every new user who creates an account on your online store. This role lets users edit account information and view order history.
- Shop Manager – permits users to run online store operations, such as accessing reports and managing products, but restricts access to website files.
Easy Digital Downloads (for selling digital products)
- Shop Vendor – allows users to edit and create products only. This role doesn’t grant access to delete items.
- Shop Worker – lets users edit and create products, categories, and tags. They can see order history but don’t have permission to access the store analytics.
- Shop Accountant – permits users to see order history and the store’s analytics dashboard, which displays earnings, the number of downloads, and the customer list.
- Shop Manager – automatically assigns users the WordPress default Editor role and gives them full access to all Easy Digital Downloads features.
Yoast SEO (for optimizing your website for search engines)
- SEO Editor – gives users permission to access the Yoast meta box and manage redirects. The Yoast sidebar settings will be hidden from the users’ end.
- SEO Manager – grants full control over all the website’s SEO configurations.
Slice WP (for building an affiliate marketing program)
- Affiliate – assigning this role to your affiliates will give them access to an affiliate dashboard displaying their referred visits, commissions, and payouts.
How to assign or change user roles
Assigning user roles in WordPress is totally simple. However, note that you can only do it if you are an administrator. Here’s how:
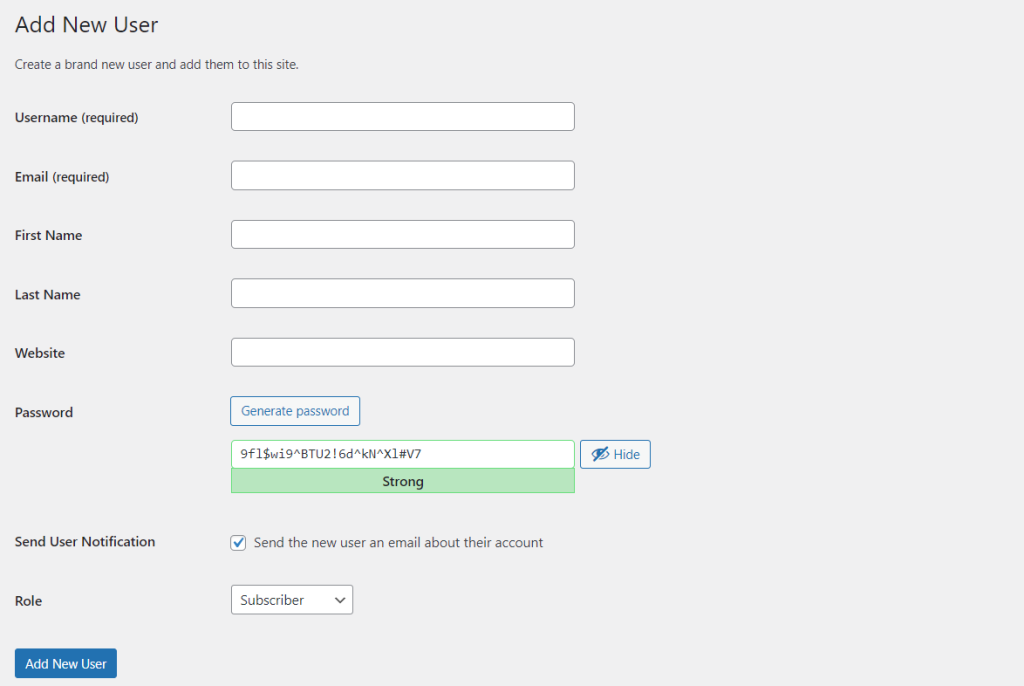
- Log in to your WordPress Dashboard, then navigate to Users → Add New Users.
- Fill out the required fields with the user’s details.
- You can create a new password for the user. However, this is optional, as the added users can also set their own password later.
- Assign the preferred role from the drop-down menu.
- Hit Add New User to finish.
Important! Always be cautious when appointing another user as an administrator. Once assigned, they have the full right to do everything on the admin dashboard, including changing configurations or deleting the entire site.
If you want to change the role of an existing user, do this instead:
- Navigate to Users from your WordPress admin dashboard.
- Hover over the user profile with the role you want to change. Click Edit.

- Under the Name section, find the Role option. Then, select a new user role from the drop-down menu.
- Finish by clicking Update User.
How to edit user roles and permissions
You can modify the five default user roles with a plugin if you need more detailed permissions.
Is this your first time using a plugin?
If you need a guide, we have a separate tutorial for installing a WordPress plugin.
Follow these steps to customize an existing user role:
- Install and activate the Members WordPress plugin.
- From your WordPress admin dashboard, go to Members → Roles, where you can find the roles list.
- Hover over the one you want to tweak and click Edit.
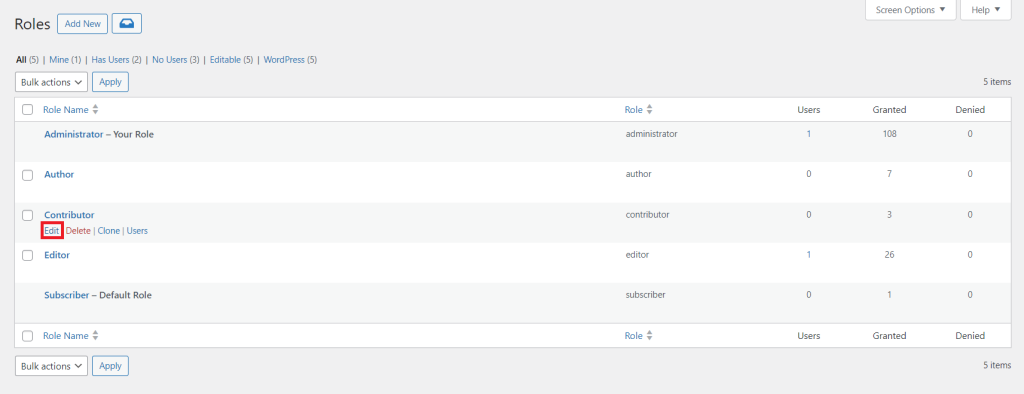
- Check the Grant or Deny boxes to add or restrict the capabilities as you see fit.
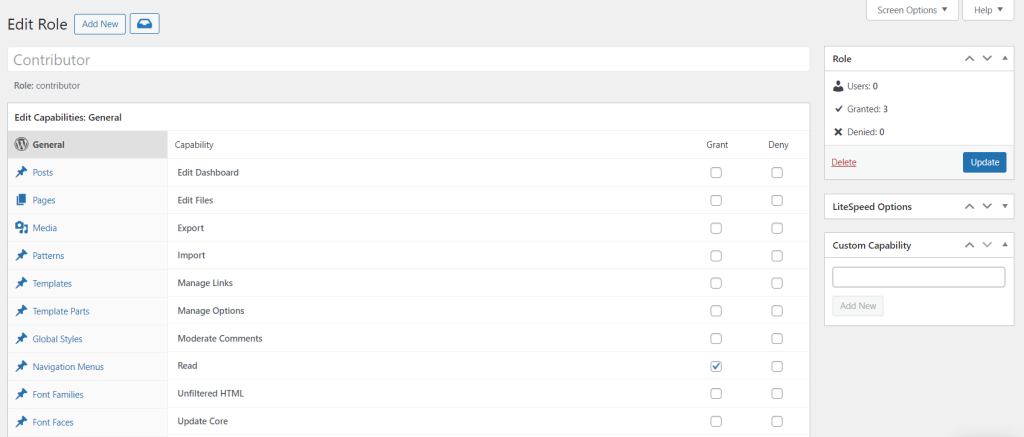
- Hit Update to save the changes.
How to create custom WordPress user roles
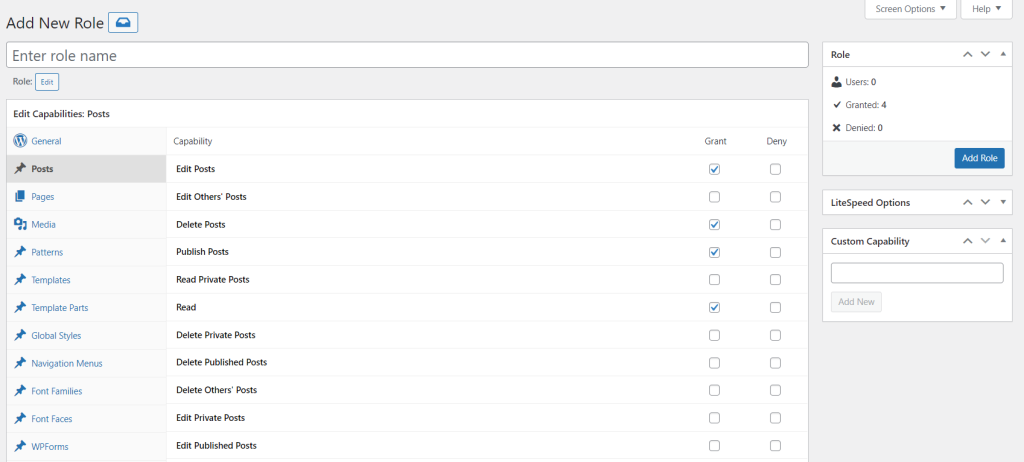
Aside from tweaking permissions for the default user roles, you can add custom ones with the same plugin. Here’s how:
- Go to Members → Add New Role.
- Enter the new role’s name.
- Select the permissions you want to Grant or Deny by checking the respective boxes.
- Click Add Role to finish.

Conclusion
Assigning roles to multiple users on your WordPress site lets you restrict access, delegate tasks effectively, and help ensure your site remains secure. To recap, here are the six default roles in WordPress:
- Subscriber – can only read published posts and comments.
- Contributor – adds and edits posts without the right to publish.
- Author – can add, edit, and publish their own posts.
- Editor – has a high level of control over the site’s content management.
- Administrator – gets complete control of every element on the admin panel.
- Super admin – has complete control of all websites within the WordPress multisite network.
Apart from these, you can also create custom user roles by activating a plugin.
We hope this article helps you understand how to manage user roles in WordPress. If you have further questions, don’t hesitate to leave a comment below.
WordPress user roles FAQ
What are the levels of users in WordPress?
By default, WordPress has five pre-defined user roles: subscriber, contributor, author, editor, and administrator. If you’re running a WordPress multisite network, there will be an additional super admin role.
Can a WordPress user have multiple roles?
WordPress default settings allow users to have only one role at a time. You can assign multiple roles by activating a WordPress user role editor plugin like Members or PublishPress Capabilities.
How do I give access to another user in WordPress?
Note that only administrators can grant WordPress user access. If you are one, go to User → Add New Users from the WordPress admin dashboard. Fill in the username and email, select a user role, and then hit the Add New User button to finish.

